Tag: door installer secret tools

The Door Is Installed Level & Plumb, but it still doesn’t work!


Has this ever happened to you?

We Can Help!


You’ve tried to do everything right, taking your time to find level & plumb perfectly.  Even shimming properly at each hinge location, but no matter what you try – the door frame will not line up correctly with the slab.  (learn some shimming tricks here)

Let’s trouble shoot some of the possible causes below:

1.  The door slab is level, but the sill is not

This is one of the most common issues when you’re facing the problem the door being installed level & plumb, but it still doesn’t work.  Look at the picture below to get a better idea of what’s going on here. 

picture-correct-door-sill-vs-an-incorrect-door-sill

A level sill is the foundation for a good door installation

As you can see, even if the door is level & plumb – if the sill isn’t, you will have a hard time getting your reveals to line up correctly.  (learn more about getting a level sill here)

2.  The door’s frame legs are not installed true with one another

Here is a picture of another trouble-spot that we’ve seen on job-sites.

Doors 101 - True

Note how the door legs don’t align with one another

It is possible to have a door slab level & plumb and one side of the door frame level & plumb. But if the other side of the door frame isn’t true with its partner – the door slab can appear warped because it will pop-out from the frame in one corner.  (you can learn more about what installing a door true means here)

3.  One of the door’s components was manufactured incorrectly

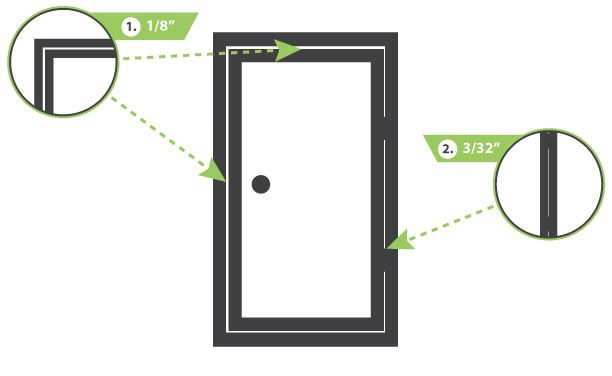
Even though it’s rare and door manufacturer’s try very hard to produce every unit correctly, it is possible for a part to be made incorrectly and find its way into the field.  Fortunately, you can check that your door was made correctly by measuring both frame legs to make sure they match and both head and sill to make sure you have a matching pair.  As for the spacing between the door and frame (usually called the reveal) it is recommended that there is at least 1/8” on both the Strike and Head sides of the door and 3/32″ on the hinge side of the door.  We’ve put together a diagram below to help explain this.

Proper reveals are required to maintain Energy STAR® ratings on exterior doors

4.  The door slab is warped

Again, this is rare for a new door. But it is possible for the door slab to warp before it has been installed.  If this has happened, the door will pop-out from the frame in one corner as mentioned above. It will also not match with its frame.  An easy way to test for this is to use a string pulled tight from the top of the bottom of the door corners. (as shown in the picture below) If the gap is larger than ⅜” from the string to the door, it is warped.
DID YOU LIKE THIS ARTICLE?

DID YOU LIKE THIS ARTICLE?

Here are some more you might be interested in! We’ve taken everything we’ve learned about door installation and wrote it down for your use

Read more

5 Cool Tools that can help with your next Door Installation


you might want to see these.

Our pick of 5 cool tools to help with your next door installation.


Below are 5 of the most ingenious tools we’ve seen when it comes to door installation. Take a quick look below to see if you could use any of these!

5 Cool Tools For Door Installation - Winbag


#1. Winbag™ USA

First on our list of cool tools, The Winbag acts as a reusable, inflatable shim. You simply insert it in-between the components you wish to shim and then as Arnold would say, you “Pump it Up!” The Winbag has an impressive shimming range from 3/32″ – 2″ and can lift up to 300lbs. Retailing for around $20, we think this is a must have for any handyman’s tool bag. Learn more at Winbag™ USA.


5 Cool Tools For Door Installation - Vacuum Cup


#2. Heavy Duty Vacuum Cups

These are great for getting a grip on heavy door slabs that would otherwise be difficult to handle. Basically a strong suction cup with a handle, these clever cups come in 8″ – 10″ sizes and can lift from 100lbs all the way up to 300lbs securely. Depending on what you want to spend, you can find a good selection of vacuum cups ranging from $40 up to $100 at WGS Online.


5 Cool Tools For Door Installation - Hinge Tweaker


#3. The Hinge Tweaker™

Over time, heavy doors tend to sag and need some adjusting, this company has come up with a unique solution that almost anyone can tackle. By “tweaking” the hinges back and forth, you can easily adjust them back to their original position. Your commercial doors will thank you and for less than $85 you can get them swinging like brand new! Learn more about this cool tool at the Hinge Tweaker™ website.


5 Cool Tools For Door Installation - CHEATAH door level


#4. CHEATAH™ door level

Another cool tool, the CHEATAH door level helps anyone easily install a prehung door.  The CHEATAH can help by showing Level & Plumb simultaneously.  Plus the built-in SHIMPADS™ help to create perfect reveals between the door and frame. This results in improved installation and function of doors, resulting in fewer warranty callbacks.  You can buy the CHEATAH™ door level here.


5 Cool Tools For Door Installation - Trim Guage


#5. Trim Gauge™

For those of us who are perfectionists, the Trim Gauge can be a best friend when it comes to getting the perfect reveal on your next trim installation. Designed to set the spacing between the trim and the door frame, for less than $30 you can keep all of your trim jobs spot on. Get yours at the Trim Guage™ website


DID YOU LIKE THIS ARTICLE?

DID YOU LIKE THIS ARTICLE?

Here are some more you might be interested in! We’ve taken everything we’ve learned about door installation and wrote it down for your use

Read more

JENTRA™

794 32nd Ave NW
Backus, MN 56435
(855) 947-4300
sales@jentratools.com

Mon-Sat: 8am - 5pm

Sign up to Our Newsletter
and Never Miss a Deal


Copyright 2021 JENTRA™. All Rights Reserved.  Tools are sold under US Patents 8,677,636 and 9,482,016.