Tag: jentra tools cheetah

How to Install a Prehung Door with the CHEATAH Door Level

Take a quick look through our instructions below

We’ve tried to take the confusion out of installing a prehung door.  Click through our instructions below to see how the CHEATAH door level can help with your next installation.   If you have any questions, please don’t hesitate to contact us!


  • Step 1. Place the Prehung Unit Into the RO and Open the Door Past 90°.
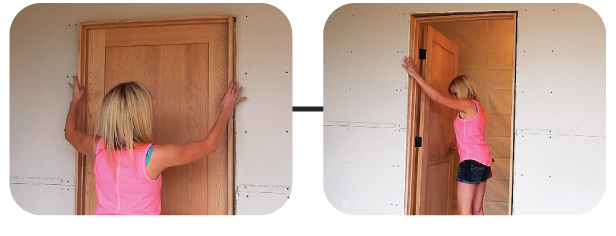
    Step 1.  Place the Prehung Unit Into the RO and Open the Door Past 90°.

    The door slab will act like a kickstand to prop the frame up.

  • Step 1 Continued
    Step 1 Continued

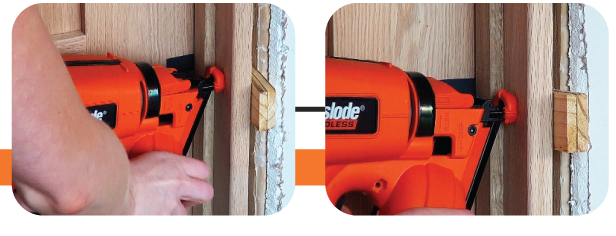
    Next, place the 3 parts labeled H at each door hinge and put Part T onto the top of the door. Place each Part S on the strike side of the door directly across from each Part H. The Orange Spacer should ALWAYS be on the hinge-pin side of the door.

  • Step 2. Line the Door Frame Up with the Rough Opening
    Step 2.  Line the Door Frame Up with the Rough Opening

    WITH THE DOOR OPEN, pull the frame back into the RO. Use the levels on Parts H and T to ensure the door is LEVEL and PLUMB before fastening.

  • Step 2 Continued
    Step 2 Continued

    START AT THE TOP and work your way down the door – shimming and fastening at each hinge location. Take great care at this point that ALL levels read correctly before moving to next step. This is CRUCIAL to achieve an accurate install.

  • PRO TIP 1 - Shimming the Hinge Side

    Shim with the thick portion facing the hinge-pin. This prevents the door from binding when shut. Also, use the long hinge screws provided with the door hinges NOW to prevent over-tightenting them later.

  • Step 3. GENTLY Pull the Door Slab Shut.
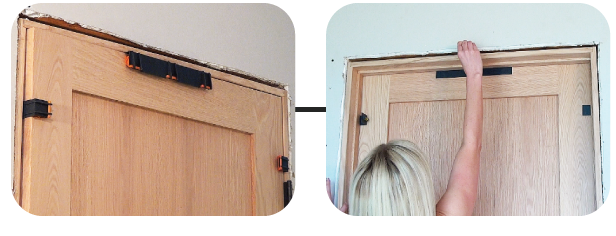
    Step 3.  GENTLY Pull the Door Slab Shut.

    The parts’ built-in shim pads will help guide the door into the frame. Next, insert shims snugly above Part T. All leveling parts are designed to act as spacers between the door and the jamb.

  • Step 3 Pictures Continued
    Step 3 Pictures Continued

    Fasten through the jamb when ready. Notice how you can easily slide Part T along the top of the door allowing you to place shims where needed.

  • Step 4. Shim the Remaining Locations
    Step 4.  Shim the Remaining Locations

    WITH THE DOOR SHUT, start at the top and shim at the 3 remaining parts S until the shims feel snug. The shim pads will help keep you from putting your shims in too far. When you’re ready, fasten through the jamb at each part. Again, the parts can slide up and down if needed.

  • Pro Tip 2 - What Fasteners to Use
    Pro Tip 2 - What Fasteners to Use

    It’s a good idea to only use nails as a secondary fastener. Your prehung door carries too much weight. Screws are recommended to fasten the hinge-pin side of the door frame. Nails on thier own will cause the door to sag and operate improperly.

  • Step 5. Remove the Parts for Next Time
    Step 5.  Remove the Parts for Next Time

    Open the door and remove all CHEATAH parts. Parts H and S are designed to fit compactly together inside of Part T. Be sure to keep your tool ready for its next use inside the provided micro-carrying bag!

  • The CHEATAH Door Level Works On:
    The CHEATAH Door Level Works On:

    Commercial and Residential doors – Single or Double doors – BOTH Inswing and Outswing doors – Doors with Sidelights or Transoms – Doors with Applied Casing – even Split Jamb doors!


CHEATAH door levels are made in the USA and carry a 100 day satisfaction guarantee.  Be sure to read the other door installation related articles in our Door Installation 101 section.

Get yours today!

Get yours today!

$39.95 – Ships with USPS tracking in 1-2 business days.

Buy Now

100 Day Guarantee

100 Day Guarantee

  • 100% Satisfaction
  • 100% Replacement
  • 100 Days
Made in the USA

Made in the USA

  • Manufactured & Assembled
  • Locally Sourced Materials
  • Made in Northern, MN

5 Cool Tools that can help with your next Door Installation


you might want to see these.

Our pick of 5 cool tools to help with your next door installation.


Below are 5 of the most ingenious tools we’ve seen when it comes to door installation. Take a quick look below to see if you could use any of these!

5 Cool Tools For Door Installation - Winbag


#1. Winbag™ USA

First on our list of cool tools, The Winbag acts as a reusable, inflatable shim. You simply insert it in-between the components you wish to shim and then as Arnold would say, you “Pump it Up!” The Winbag has an impressive shimming range from 3/32″ – 2″ and can lift up to 300lbs. Retailing for around $20, we think this is a must have for any handyman’s tool bag. Learn more at Winbag™ USA.


5 Cool Tools For Door Installation - Vacuum Cup


#2. Heavy Duty Vacuum Cups

These are great for getting a grip on heavy door slabs that would otherwise be difficult to handle. Basically a strong suction cup with a handle, these clever cups come in 8″ – 10″ sizes and can lift from 100lbs all the way up to 300lbs securely. Depending on what you want to spend, you can find a good selection of vacuum cups ranging from $40 up to $100 at WGS Online.


5 Cool Tools For Door Installation - Hinge Tweaker


#3. The Hinge Tweaker™

Over time, heavy doors tend to sag and need some adjusting, this company has come up with a unique solution that almost anyone can tackle. By “tweaking” the hinges back and forth, you can easily adjust them back to their original position. Your commercial doors will thank you and for less than $85 you can get them swinging like brand new! Learn more about this cool tool at the Hinge Tweaker™ website.


5 Cool Tools For Door Installation - CHEATAH door level


#4. CHEATAH™ door level

Another cool tool, the CHEATAH door level helps anyone easily install a prehung door.  The CHEATAH can help by showing Level & Plumb simultaneously.  Plus the built-in SHIMPADS™ help to create perfect reveals between the door and frame. This results in improved installation and function of doors, resulting in fewer warranty callbacks.  You can buy the CHEATAH™ door level here.


5 Cool Tools For Door Installation - Trim Guage


#5. Trim Gauge™

For those of us who are perfectionists, the Trim Gauge can be a best friend when it comes to getting the perfect reveal on your next trim installation. Designed to set the spacing between the trim and the door frame, for less than $30 you can keep all of your trim jobs spot on. Get yours at the Trim Guage™ website


DID YOU LIKE THIS ARTICLE?

DID YOU LIKE THIS ARTICLE?

Here are some more you might be interested in! We’ve taken everything we’ve learned about door installation and wrote it down for your use

Read more

JENTRA™

794 32nd Ave NW
Backus, MN 56435
(855) 947-4300
sales@jentratools.com

Mon-Sat: 8am - 5pm

Sign up to Our Newsletter
and Never Miss a Deal


Copyright 2021 JENTRA™. All Rights Reserved.  Tools are sold under US Patents 8,677,636 and 9,482,016.